We've come a long way, Baby! This stuff was considered "racey" back in the 60's!

The Cutest Little Birds!

2012_03230014 by Fizule71
2012_03230014, a photo by Fizule71 on Flickr.

Aren't these little crocheted birds delightful? I just LOVE the colors... perfect for Spring! I found a photo of these on Flickr. This lady has some really creative things in her photostream.

For the last 10 years or so, Mr. Craftola and I have been hosting an annual Murder Mystery Dinner Party. Most have some sort of "theme" or time period which aids in planning costumes, menu and party decorations. This year, our Mystery takes place at a Circus! I have had so much fun planning the food and decorations, many of which I have made. I'll be sharing some of these on the blog in a following post.
Hello Bloglanders,

I'm BACK! Yes, after neglecting this blog for oh, so long, I am once again motivated to get back into sharing my craftiness and a whole bunch of other stuff. To celebrate this re-awakening, I have given Craftola a new look. I hope you like it!

In honor of the occasion, ol' Craftola decided to share my most recent baking adventure and my recipe. Last Sunday I made a Coconut Cream Pie and it was sooooo good. It is, what some call, Semi-Home Made, so pretty simple to do in a 3-step process.


First, you have to make the pastry dough. I use this No Fail Pastry Recipe found at AllRecipes.com. Follow the directions, pricking the crust with a fork before baking at 350 degrees for 15 - 20 minutes. Let Cool before filling. (While baking the pastry crust, put a 1/2 cup of shredded coconut in the oven to toast to a golden brown, for the topping.)

While the crust is cooling, prepare a large package of Cook and Serve Vanilla Pudding, according to package directions. As it is thickening, add 1 cup shredded coconut to the pudding. Pour into cooled pie crust. Place in refrigerator until cooled and firm.

Last, top with your favorite non-dairy whipped topping. (You could make your own whipped cream, if you want to go the extra mile. I didn't, at this point!) Sprinkle with the toasted coconut prepared earlier.

Eat and Enjoy!
I had surgery on Thursday to remove the "Growth" on my left wrist.(AND, I'm left-handed!) Yes, after 15 years of annoying pain and unsightliness, I elected to have my pesky ganglion cyst removed.
I don't mean to sound like a whiney-hiney, but this keeping my arm elevated with a heavy cast and not being able to lift or move anything is getting old...quick! The arm itself is not THAT painful, but more of a pain in the "you know what" to follow Doctor's orders!
I will be off work and out of the crafting scene until Thanksgiving. So unlike me, not having 3 projects going at once, but its necessary for the healing. Happy Healing to me and Happy Halloween to YOU! :>)

What's for Supper?

October has been an uber busy month, as always! With Birthdays, Pumpkin Patches to visit, Halloween Parties and town Festivals, it seems there is always something to do!!!

On this day, I'm taking it pretty easy, sitting in my recliner with my yarn and hook, working on a particularly complicated lace scarf. To avoid the Sunday evening question, "What's for Supper?", I put some chicken breasts in the crock pot to cook and I'm going to make Chicken Kisses.
If you click on the link, you can see how easy Aimee's recipe is. I think it will really hit the spot on this cool Autumn evening. Of course, I'll have to make some mashed potatoes to go with all the gravy and creamy goodness! Thanks to Aimee for sharing this and many other delicious recipes!
I finally completed the Halloween Rag Quilt today!!!! Got up extra early this morning to finish clipping the last 2 rows 'cause I wanted to get it finished in time to ENJOY it this season. The finished quilt measures a little under 5 foot by 5 foot (due to slight shrinkage during the washing today). It just started to "rag out" on the first wash and dry in the following pictures. Can't wait until the seams get the wonderful chenille-like softness...

I'm pleased...hope you like it, too!

Here's more of a close up:

"Owl" Keep You Warm!

Dear Daughter's Birthday is right around the corner and she wanted a pair of cheery owl slippers which had really caught her eye. So.... being the dutiful mother I am, I decided to make her a pair. It was a real "hoot" when the newest Opus-Gluei challenge happened to be Owls. These are made from plain ol' Red Heart yarn, some scraps of Simply Soft and a size G crochet hook. A fun project, in my opinion!
I am double posting today, but as I said earlier, I really get my "craft" on in the Fall. I have been working on a Halloween Rag Quilt and finished sewing the blocks together this afternoon. I took a break from clipping seams and when I turned around, my little Blue-eyed cat had jumped up on my work table and curled up on it to take a snooze. Oh well, it will have to be washed 2 or 3 times anyway to rag out the seams. She does look kinda cute laying there.

Fall rejuvenates me. Its this time of year that I really get my "craft" on and start making things I couldn't bring myself to start during the hot, lazy days of summer.

Thought I'd share my recently finished Halloween Altered Bag Book. I posted a 2 page spread earlier of the "Little Witches Dancing" and thought I'd show the rest of the book completed.

This is the cover. I used masking tape and several painting techniques before doing the Mod Podge transfer method for the image.

Here's another 2-page spread of just some random stuff I thought would look nice at the time.

I really like the crow and the Ouji Board idea that I saw in another Halloween Book on a search - yes, its NOT my original idea, but what the heck.... Thanks to the person who did think of it!!!!!

Here is the last page. By the time I was here, I just wanted to finish it. I already had the image, so just glued it in and added a few embellishments. I do seal all of the pages with either Mod Podge or clear acrylic spray for protection.

Hope you like it! It was fun to make.
I must admit, I'm ready for Fall. After the long, hot summmer, Autumn brings the promise of cooler days and crispy evening temperatures. For his first trip to the local Pumpkin Patch next month, I made my little grandson this cute crocheted pumpkin hat. It fits him perfectly and he loves the bright orange color!

I used Peanutz Mom's pattern, only I used a "G" sized hook instead of an "H". I thought the larger hook would render a hat too large and I was correct. The G hook was perfect for him. This is a "very do-able in an afternoon" project, so maybe you'll get inspired to bring out your hooks and yarn to make a little one in your life a Pumpkin Hat, too... Enjoy!
I thought I'd share a two-page spread from the altered Halloween bag book I'm currently working on. Originally thought I'd use 3 plain brown paper bags for the book (12 pages), but now I'm leaning toward only using 2.

Pictures forthcoming of the finished product!

Inspired...

Once again, I was inspired last week while "blogging" around. So inspired, I actually made a trek to the local kitchen linen store AND the fabric place. The source of my inspiration was this uber cute Halloween kitchen towel! Being the practical person I am, I opted for Autumn prints so they can be used until Thanksgiving. Hopeful they will be finished by next weekend. ( Have another busy week coming up! )

cANdY CoRN cRAzY

With cooler weather approaching, I just HAD to make this cute candy corn hat for my little 7 month old grandson! The pattern I used can be found here. I did make one change to the pattern to make it a little bigger...on the 8th row, I increased 4 stitches evenly spaced, as the pattern was sized for a newborn. Can't wait for him to try it on later today. Sure hope it fits!

BUT, I couldn't stop with just a candy corn hat! With all of the orange, yellow and white yarn left, I was called to make something else. So, back to, what else? COASTERS! Here for your viewing pleasure and crafty inspiration, I share my candy corn coasters. Enjoy!

Kris Dickinson over at "A Nostalgic Halloween"
is having a give away on September 6, 2011. I don't know about you, but I would love to win one of these packages! Go on over and check out her lovely nostalgic Halloween altered art-collage work and get inspired!

A while back my daughter and I spent a happy, crafting afternoon decontructing a t-shirt. We started with a Men's white, short sleeved T-Shirt, a tie dye kit (available at Hobby Stores or Wal-Mart), scissors, needles and thread. Basically, we dyed the t-shirt(gradiated), cut away the neck, sleeves and some length from the bottom. Then we cut the scraps into strips to make the rosettes and embellishments. The fun part for us was custom fitting the neckline to our taste while trying it on and hand sewing the rosettes with a twisting, woven motion. We also pinned in and used a sewing machine to make the waistline a more flattering "girly" fit. I was very pleased with the results... How about you?

I like to bake on Sundays. While having coffee this morning, I grabbed up one of my MIL's old cookbooks and while skimming through, I found this recipe for "Petticoat Tails". I guess I've lived under a rock, because I'd never heard of these shortbread cookies... so I did a Google image search and it's apparent these are a very popular cookie!

Anyway, here is the easy recipe from the "Country Inn and Bed & Breakfast Cookbook" (1955):

6 tablespoons sugar
2 1/2 cups flour
2 sticks butter or margarine

Blend sugar with flour, cut in butter until mixture holds together. Using a fork, pat into a round cake pan and chill overnight. (I think I'll try putting into the freezer for about an hour and bake same day!). Using a table knife, score 16 wedges into the top. Bake at 300 degrees until lightly golden. (About 20 - 25 minutes) Store in airtight container. Makes 16.

I can see how these buttery cookies resemble the edge of a petticoat, can't you? Enjoy...


Gray and Yellow Team Up!

Gray and Yellow have always been one of my favorite color combinations. As a matter of fact, they were the colors I chose for my wedding! When I was looking around on different craft sites this morning, I ran across this lovely nursery ensemble. The website calls it a "Citron and Gray Nursery", but to me, it looks like bright yellow and gray. For any of you who like this as much as I do, you can find the complete tutorials and patterns for sewing these fab nursery accessories, as well as where to order the fabric HERE. Enjoy!


Hello Bloglanders,
I have decided to start blogging again about my creative endeavors. I hope this time around, I will be able to devote at least one entry a week here and also keep up with my other blog, DejaDoo. As well, I'd like to get back with my friends over at the Opus Gluei and join some of the fun with their weekly challenges!

I wanted to share a quick and easy little coaster I made today. I think the whole thing took 20 min. and that included picking out the yarn! To me, its like a cute little sun which should brighten up my coffee mug on a cold winter's morning. The pattern I found on a deep blog search and for the life of me, I can not get to where I was to find it. If I could, I would give all credit to the wonderful crocheter who shared it. I want to state that I did not design this pattern! AMENDED! Here is the link to the pattern, over at Yarnchick's Blog!

So if anyone is interested in having it, please leave a comment with your email and I will get back to you... Happy Crafting!

NEW BLOG!!!

Hi Everyone,

Wanted to invite you all to stop by and check out my NEW blog. It might be your cup of tea, or maybe not. Anyhoo, here is the url...hope you'll follow me in this newest venture!!!

dejadoo.blogspot.com
Looked into Grandma's recipes tonight and found an interesting cookie recipe. This one is called "Honey Cut-Outs", torn from a newspaper. From the information surrounding it and the age of the paper I would say its from the Korean War Era. (1950's?)

I think this recipe would render an awesome cookie. Next time I'm in the mood to bake cookies, this is definitely one I will try! Here it is:

Honey Cut-Outs

Mix thoroughly 1/3 cup soft shortening, 1/3 cup sugar, one egg, 2/3 cup honey and one teaspoon lemon flavoring. Sift together and stir in 2 & 3/4 cups flour, one teaspoon soda and one teaspoon salt.
Chill dough.
Roll out to 1/4 inch thickness and cut into desired shapes. Place 1 inch apart on a lightly greased baking sheet. Bake at 375 for eight to ten minutes. Cool and decorate. Recipe makes about 5 dozen, 2 1/2 inch cookies.
Enjoy! Have a great weekend!!
(Picture Courtesy: A Cookie Project)

~
My last post was about an adventure in making Fiber Art Scarves. Sunday, I had the whole day to "play" with the process and as yet, I haven't completed Scarf #1. There was a bit of measuring and cutting preparation before I could even begin adding the fibers to the Solvy. Once I had everything in place and pinned together, it was then time to do the endless sewing of the sandwiched layers on the machine. After 6 hours of non-stop work and two spools of thread, I felt like I should call it finished. Being so tired after all of that, I decided to take the scarf to work and do the soaking there. (Yes, being an Art Teacher, I have that luxury!)

But oh no, that didn't happen! Upon taking it out and inspecting it one last time, I decided "What the Heck"... I have some gold metallic thread, I'll just add some hand stitched embellishments before I soak off the Solvy. So folks, that is where I stand. The hand stitched embellishments are half-way finished. I hope to have the scarf completed on Friday. Have no fear, though. Pictures have been taken every step of the way and I will share these. In the meantime, wish me happy hands and creative thoughts!!!

~

Fiber Art Scarves


Yippee! My order of Solvy Water Soluble stabilizer should be out for delivery today! DD and I have decided to make a few Fiber Art Scarves for Christmas presents this year. With two art teachers, two sewing machines and a yarn stash that spans over thirty years, I'm sure we can come up with some marvelous, one-of-a-kind scarves. The best part is we might have tomorrow to try the technique out!


In case some of you have never seen or heard of these before, they are a no knit/no crochet type of scarf that you sandwich between layers of the water soluble stabilizer, free stitch on the machine and soak the stabilizer away. This leaves a beautiful open and airy scarf that can be embellished with beading, embroidery or whatever...


I found an example/inspirational picture which I am posting today, here: http://www.nancydorian.com/gallery.html

I hope to post pictures of our works in progress and some final results when we embark on our adventure in Fiber Art Scarves. Have a great weekend, everyone!


~

Food for Thought Friday...


Food for Thought Fridays might become a weekly thing...we'll see how the wind blows me on this. I was motivated to write this post after looking through my Grandmother's handwritten/newspaper cropped recipes which I was blessed to inherit so many years ago. Grandma was born in 1900 and some of these recipes are truly a treasure! Today I thought I'd share a very unusual recipe, at least it was for me, "Steamed Carrot Pudding". Judging from the coat advertisement on the back, I would say this one is from the 1930's. I did a google image search and actually found this picture on the http://www.tasteofhome.com/Recipes/Steamed-Carrot-Pudding website. You can check their recipe or go by the one I am posting below...


1 cup grated carrots

1 cup grated potatoes

1 cup raisins

1 cup sugar

1 cup flour

1 teaspoon soda

1/8 cup milk

1/2 teaspoon salt

1 teaspoon vanilla


Mix ingredients, pour into greased pudding mold. Cover tightly, steam 3 hours. Unmold and serve warm.


Quite interesting, as I never usually think of adding sugar to mashed potatoes and carrots. If anyone tries this out, please let me know!

~


With Thanksgiving approaching, many of us have already started thinking about the menu, tableware and decorations needed to host a Holiday Dinner. I wanted to post an edible treat which was a big hit at one of the Thanksgiving dinners I hosted. Its the breadstick cornucopia.


To me, the cornucopia represents our thanks for abundant food and the joy we receive from sharing our good fortune with family and friends. What better way to celebrate Thanksgiving than to have an edible representation to share.


If you do an internet search you will find instructions to make one of your own. Hope this will inspire you to try one and share this edible Thanksgiving centerpiece.
~

The Trick is in the Treat!

It was one of those nights this week....neither Hubby nor I wanted to cook and nothing ordered out sounded good to us. Thus, checking our pantry and fridge, THIS is what we had! The most scrumptious...the most fabulous.....chili-cheese fries!!!!!!!!!!

Granted, this is not the healthiest of food. I know this. Its loaded with salt, fat and God only knows what else, but on a cool Autumn evening when no one wants to cook, this is a real treat! Quick, easy and filling, it one of my favorite comfort foods. All you need is a bag of frozen french fries, a can of chili and some shredded cheese to create this fine trick of a treat. Are you hungry, yet?
I read somewhere online that the hottest, new color combination is Orange and Aqua. If you stop and really think about it, orange alone is a pretty hot color. I LOVE the color orange (probably a hold over from the 1970's when it was used everywhere, including my first kitchen's walls!). To pair it with aqua....who knew? After a short google image search I found some really unique ideas that paired the two colors. The follow pictures can inspire a whole new dimension to your thoughts on the color pairing.... Enjoy the eye candy!


I love this party table setting.....can you imagine attending a dinner party with this lovely table available upon which to dine?-------------------------------->


<--------Look at the "pop" of chartruese in this tablescape....


Then, of course, you'd have to wear a matching dress for the party...
------------------------------->


It seems that the possiblities are endless on how orange and aqua can be used together to create a fun and lively color combination!
Happy Halloween 2010! I sure hope that everyone is having a very nice weekend. Here in my neck of the woods, there have been Fall Festivals, several parades, costume parties for adults and of course "Trick-or-Treat" night for the kids to shine in their cute costumes. It's sad for me to let October go, but November and December bring in all of the family gatherings, good food and another Season.

In case anyone is having a last minute Halloween party tonight, I found the most gruesome entree' idea. It's called the "Meat Hand" ~ actually a meatloaf shaped like a hand with onion slices for the nails and bone. The ketchup and sliced cheese on top give it a really gross appearance to say the least. I found the picture and the recipe over at http://www.notmartha.org/archives/2009/10/27/meat-hand/
I'm sure if you get past the shape, its a delicious meatloaf which would be a hit at any Halloween party! So with that in mind ~ Happy Halloween....BOO!


Okay, I don't know where I was when this recipe became popular back in the 80's, but I'm glad I ran across it today! With the Holidays approaching, I like to have a few breakfast recipes on hand to make for any over night guests who wake up hungry. They look to be an ideal sweet offering for a brunch. You can find the recipe at the Pillsbury Website. Enjoy!


When I saw this shawl collared baby sweater, I KNEW I had to make one for my little grandbaby-boy, due to arrive in a few months. Its a Debbie Bliss Pattern that is available for FREE on Ravelry. What a fun and easy knit....I love the way the stockinette stitch curls on the sleeves and bottom, with the wide ribbing to finish the front. It was really hard for me not to add a 2x2 ribbing at the sleeve edge and bottom of the sweater, but the curled up edges add to the charm. The super huge button was a personal choice. ( It snaps, the button is sewn on top.)


I used Bernat Baby Coordinates in the Soft Blue color. I also chose to use size 8 (US) needles for the entire sweater, as the pattern called for size 7 for the ribbing. All in all, it was a very enjoyable knit. My only wish would be that it was available in adult sizes! Can't wait to see the little fella wearing it.... :>D
Here is a picture of some of the outdoor decorations I put up for Autumn. The scarecrow in the picture is made from wood that was cut to shape which I painted and assembled. I added the embellishments to give the little guy a bit more personality. Unfortunately, I can't take credit for the bale of straw, the mums or the pumpkins and gourds... those were purchased at a local farmer's market. I hope it all holds up until the day after Thanksgiving!!

I'd love to hear about how others have decorated for fall. Enjoy the Season, everyone...
I thought I'd share a pix of our tree in the front yard. It is one of the prettiest in the neighborhood, if not in our whole town, during this season. In honor of my favorite month of the year, here is a poem that expresses my sentiments about the month of October:

"October's the month
When the smallest breeze
Gives us a shower
Of autumn leaves.
Bonfires and pumpkins,
Leaves sailing down -
October is red
And golden and brown."
- Can Teach Songs


( Courtesy of http://www.egreenway.com )


If anyone is looking for an easy Halloween/Fall Decoration to get their "craft on", this one is it! I loved making this one and its do-able in an evening. All you need are some different fall colors of felt, a needle, some thread, along with a few beads and buttons to construct one. In a short time you can create a Candle Cozy for your home or an Autumn gift.


Since a picture speaks a thousand words, I'll just show the picture. You can measure your particular candle's height and circumference to make up your own pattern. Use your imagination on the stitches and embellishments. Most of all, have fun with it!


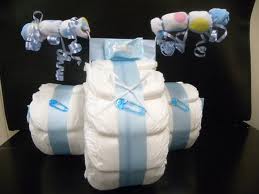
In case some of you haven't heard, I'm going to be a "Grandma"! This will be our first grandchild, so you can imagine how happy and excited we are. I've been so busy all summer and fall making little outfits, trimming receiving blankets and knitting little goodies for our first grandson. I saw a little tricycle diaper cake that would be perfect for the baby shower and had to share the idea. Isn't it cute?

If you are interested in how to make one of these, I found some basic instructions here:


Soon I will post a pix of the yummy green cables and ribbon baby sweater FINISHED! One more sleeve to go and then it will be on to a Baby Blue sweater for my little grandson!
The Gals over at Opus Gluei fired me up this week with their Challenge....anything crafted for Halloween. I wanted to share a shadowbox decoration I made a while back to sit on my mantle during this Season. Using a 5" X 5" chunky pre-stretched canvas, some paint, vintage clip art and other bits, it was finally finished! I think it turned out really cute! I also used several coats of decoupage medium and a final coat of crystal glitter to give it a frosty look. Oh yes, the "frame" was made from a free yardstick that just happened to be a tiny tad wider than the chunky canvas, which was perfect for the shadow box effect. The fake leaves, gourds and pumpkins are epoxied to the frame.

Here it is:

Opus Gluei Challenge #74

Lasagna is a favorite around our house. Unfortunately, I haven't taken the time to make the "real" thing for several years. When served around here anymore, its of the frozen variety offered at the local supermarket. So... as a special treat for my Daughter's birthday dinner this weekend, I told her I'd make a big batch of home made lasagna for the family's celebration. I'll serve it with split loaves of french bread drizzled with galic butter/shredded cheese and a simple tossed salad.

In case any of you are interested, I am posting the recipe that I always use and always with fantastic results. Enjoy!

Lasagna ~ Serves 8 - 10

Ingredients:
1 pound Hamburger or Italian Sausage
1 clove garlic, minced (or to taste)
1 tablespoon whole basil
1 tablespoon oregano
1 1/2 teaspoon salt
1 qt. Tomatoes
2 (6-oz) cans tomato paste
10 ounces lasagna noodles
2 eggs
3 cups Ricotta, cottage or feta cheese
1/2 cup grated Parmesan cheese
1 teaspoon salt
1/2 teaspoon pepper
1 pound mozzarella cheese, shredded

Directions:
Brown meat slowly, spoon off excess fat. Add next 5 ingredients; simmer uncovered 30 minutes, stirring occasionally. Cook noodles in large amount of boiling salted water till tender; drain; rinse. Beat eggs; add remaining ingredients, except mozzarella. Layer half the noodles in 13X9X2 inch baking dish; spread with half the Ricotta filling; add half the mozzarella cheese and half the meat sauce. Repeat. Bake at 350 degrees F about (or assemble early and refrigerate; bake 45 minutes.) Let stand 15 minutes before serving.
(Recipe Courtesty of the Better Homes and Gardens Cookbook I recieved as a wedding gift 30 years ago!)
Once again, I picked up my needles to knit (not like I've ever really put them down!) Thought I'd share the newest project, a baby sweater. Yes, a baby sweater for my grand-baby in waiting!!! This will be our first grandchild and I can't wait to meet her/him. So, in the meantime, I've been sewing and knitting lots of yellow and green until we know for sure.

Here is my current project, a Cables and Ribbon pattern for a baby sweater I found on the internet. It's an easy knit, the cables are what slow me down. I started it last Thursday, so with only working on it an hour or two a day, I'm already to the point I can divide it into fronts and the back on holders. Hopefully, I'll have it finished in a couple of weeks. Love the yarn, Simply Soft....can't beat it for beautiful baby things.
Greetings to All!


Its now fall and after a few months of respite, I feel renewed; ready to join the blogging world once again! The Spring and Summer were a whirl-wind of activities and travel. I let my mind have a much needed rest after several months of work and intensive writing. This new season brings on a new revitalization in my psyche and my creativity. I have been working on many projects which I hope to share with everyone in the coming weeks. Stay tuned for more posts... I'm back!!!!


Writing for Others....

Please forgive my absence and lack of posts on my blog. Priorities shift and at this time I have been so busy writing for other people's blogs I have sorely neglected my own. I still do all the things I normally do: Crafting, Decorating, Cooking and all of it, but I have embarked on a new endeavor - being a free-lance writer.

I have found that being a free-lance writer is not only challenging but enjoyable for me. Learning new things everyday is a part of the job that I find the most interesting. The pay is nothing to write home about, but as I get closer to early retirement, I think that this will be one of the many things I will continue to do and relish.

My Mystery Party games have also been selling at an amazing rate. They have been well received all over the world and that creative side of my writing will be one that I continue to explore. Last year alone, I authored four of these scripts which take on average six to 12 weeks, each. That type of writing takes clever dialogue, interesting characters and reasonable outcomes to deduce the culprit.

I am not saying "farewell" but rather "I'll be back". I need to find a balance between my family, writing professionally, working full-time and all of my other interests. I'll be posting once in awhile in the future, but not on a weekly basis. I want to thank all of my faithful readers for staying with me...I have made many good friends from blogging and each are dear to me.

Enjoy the upcoming week and let's all hope "Spring has Sprung!".

Kathy


Wow was the word for our Red Hat Ladies' Valentine's Dinner last night. After trying to find a caterer to no avail (all were booked for weddings and bigger parties!), it was decided to cater it ourselves. With an Italian theme in mind, we served Italian beef, baked penne pasta, breads, garden salad, fresh shrimp, fruit platter and tons of desserts. The best part was having all of our spouses with us and dancing the night away to 70's and 80's music provided by the band playing in the public area. It was a wonderful evening of fun, friendship and frolic that none of us will soon forget.


(Photo courtesy: flickr.com/photos/38684070@N00/3385692754/)